How to Install Bahama Shutters
Installation instructions are written by ShutterLand, a U.S. exterior shutter specialist with over two decades of hands-on experience mounting shutters on residential homes and commercial properties.
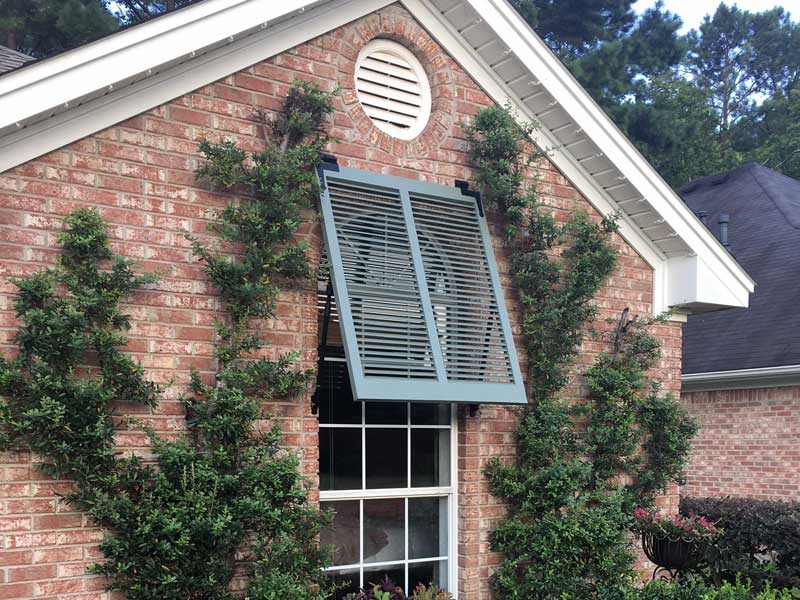
Bahama shutters, also called Bermuda shutters, install above the window with a continuous top hinge. Adjustable support arms connect the lower portion of the shutter to the building and hold the shutter outward at the desired angle.
These instructions apply to wood Bahama shutters and PVC Bahama shutters from ShutterLand. Aluminum Bahama hurricane shutters use different hardware and installation requirements. Follow the separate instructions to install aluminum Bahama shutters.
Proper installation begins with correctly sized shutters and the appropriate hinge configuration. Review the instructions to measure for Bahama shutters before ordering.
Before Installing Bahama Shutters
Inspect the window and surrounding mounting surfaces before beginning. The top hinge and support-arm brackets must attach to surfaces capable of securely holding the weight of the shutter.
Installation screws are not included because the appropriate fastener depends on the building material. Wood, siding, masonry, stucco and other exterior surfaces may require different screws or anchors.
The installation process may need to be adapted to the conditions of each window.

Bahama Shutter Top Hinge
ShutterLand wood and PVC Bahama shutters install with a full-width aluminum track hinge. The hinge consists of two interlocking sections.
One section mounts to the building above the window. The second attaches to the upper front face of the shutter. The two sections slide together, suspending the shutter while allowing the bottom to pivot outward.
The hinge is supplied in a natural silver aluminum finish and can be painted when desired.
Three hinge configurations are available:
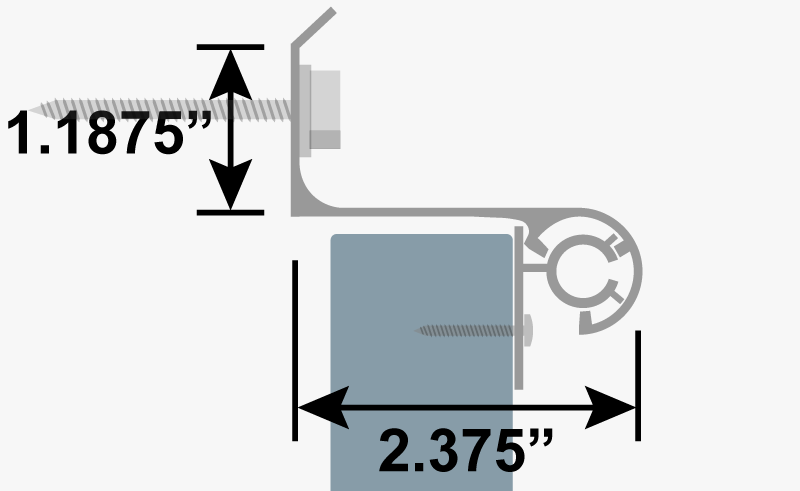 | Standard Hinge The standard hinge is 2.375 inches deep and mounts to a flat vertical surface above the window. |
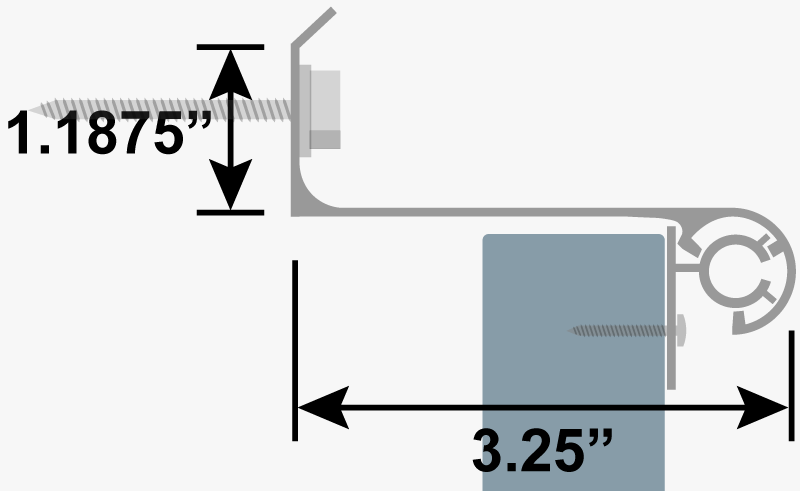 | Deep Hinge The deep hinge is 3.25 inches deep and provides additional clearance between the shutter and building. |
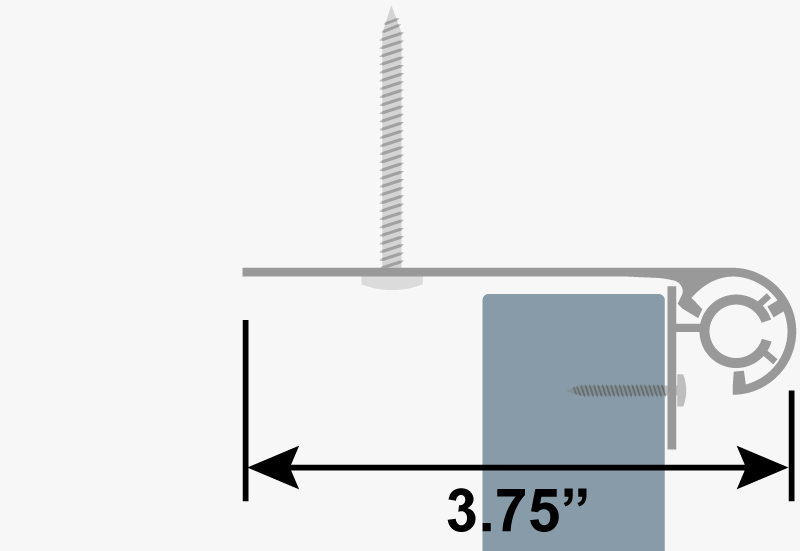 | Flat Hinge The flat hinge mounts to the horizontal window header. It is generally used for an inside-mount installation where the shutter nests within a sufficiently deep window opening. |
The appropriate hinge should be selected when measuring for Bahama shutters.
How to Paint the Aluminum Bahama Hinge
The aluminum Bahama hinge arrives unfinished and can remain natural. For a painted finish, prepare and paint the raw aluminum before installing the hinge.
- Clean the raw aluminum with soap and water to remove dirt, oil and residue.
- Rinse thoroughly and allow it to dry completely.
- Lightly scuff the surface with 180–220 grit sandpaper or a fine Scotch-Brite pad.
- Wipe the aluminum with denatured alcohol and allow it to dry.
- Apply one thin coat of self-etching primer formulated for aluminum.
- Allow the primer to dry according to the manufacturer’s instructions.
- Apply two coats of high-quality exterior-grade 100% acrylic latex paint, allowing the recommended drying time between coats. Alternatively, apply 2–3 light coats of exterior-rated spray paint, following the manufacturer’s recommended recoat times.
- Allow the finish to fully cure before assembling or installing the hinge.
Take care not to create excessive paint buildup inside the interlocking track. The two hinge sections must be able to slide together and pivot freely after finishing.
Bahama Shutter Support Arms
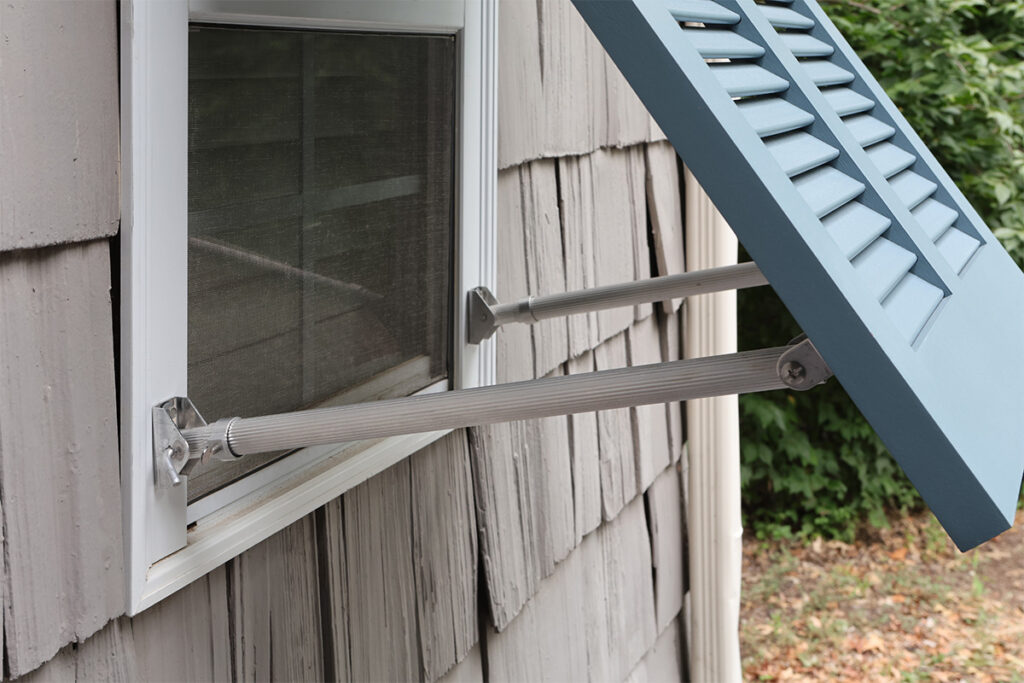
Adjustable support arms, also called shutter stays, hold the bottom of the shutter away from the building.
Each support assembly connects a bracket on the back of the shutter to a bracket mounted alongside the window. The adjustable arm allows the shutter to be raised or lowered to the preferred position.
ShutterLand support arms are available in three lengths:
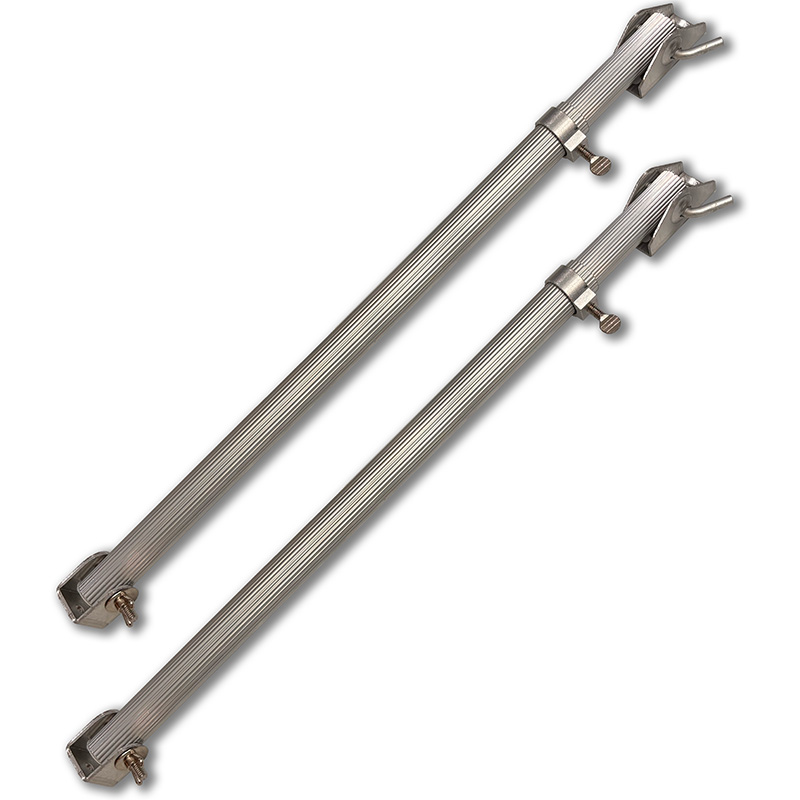 | Available Support Arm Lengths: 12″ Arms extend to a maximum length of 20″ including the brackets. 18″ Arms extend to a maximum length of 32″ including the brackets. 24″ Arms extend to a maximum length of 44″ including the brackets. — Wall Brackets (Camel Brackets): 1.125″ wide, 2.375″ tall, 1.375″ deep Shutter-Side Brackets: 1.125″ wide, 1.0625″ tall, 1.5″ deep |
The appropriate length depends on shutter height, bracket placement and the desired opening angle. Mounting the brackets higher on both the shutter and building generally requires a shorter support arm.
The support arms are supplied in raw aluminum with a natural silver finish. They can be painted using the same preparation and finishing process described for the aluminum hinge. Because the smaller inner tube slides inside the larger tube when the arm length is adjusted, paint on the smaller tube may scratch or wear during adjustment.
Choosing a Bahama Shutter Angle
There is no single required opening angle for decorative wood or PVC Bahama shutters. The best position depends on the desired amount of shade, outward visibility and clearance around the window.
For the clearest view through the shutter, position it so the fixed louvers provide a comfortable horizontal sightline from inside the building. The exact shutter angle will vary with the louver configuration.
A slightly lower shutter position can increase shade and reduce how far the shutter projects from the building. This can be particularly useful near walkways, patios or other areas where additional clearance is desirable.
When several Bahama shutters are installed on the same elevation, use a consistent angle for a uniform appearance.
How to Install Bahama Shutters
Step 1: Separate the Bahama Hinge
Separate the two sections of the track hinge by sliding one hinge leaf out of the other.
Identify the smaller section that will attach to the shutter and the larger section that will mount above the window.
Step 2: Mark and Drill the Hinge Holes
Beginning approximately 1.5 inches from each end, mark the screw locations across both hinge sections.
Space the remaining mounting points evenly across the hinge with no more than approximately 8 inches between screws.
Drill holes large enough for the selected mounting screws to pass through the aluminum hinge.
Step 3: Attach the Hinge to the Shutter
Place the shutter face up on a clean, stable work surface.
Confirm that the shutter is correctly oriented. When installed, the louvers should slope downward toward the exterior when the shutter is in the closed position.
Center the smaller hinge section along the upper front face of the shutter with the C-shaped channel above the screw holes.
Pre-drill the shutter at each mounting location. Avoid drilling completely through the shutter.
Secure the hinge using appropriately sized corrosion-resistant screws.
Step 4: Position the Shutter-Side Support Brackets
Determine where the support arms will connect to the building on each side of the window.
Transfer these positions to the back of the shutter so the left and right support arms will remain properly aligned. The shutter-side brackets are typically mounted to the side stiles slightly above the bottom rail.
Mark and pre-drill the mounting holes, then secure the brackets to the shutter.
When surrounding space is limited or exact alignment is difficult to determine, these brackets can be positioned after the shutter is hanging.
Step 5: Position the Building-Side Hinge
Hold the larger hinge section against the building at the predetermined location above the window.
Install a screw near one end of the hinge. Use a level to position the opposite end, then install a second screw.
With the hinge level, mark and pre-drill the remaining mounting locations.
The mounting surface and selected fasteners must be capable of supporting the shutter.
Step 6: Assemble the Shutter and Hinge
Remove the temporarily installed building-side hinge section.
Slide the shutter-mounted hinge section into the track of the building-side section. The shutter and hinge can now be lifted into position as one assembly.
Step 7: Hang the Bahama Shutter
With assistance, lift the shutter and hinge assembly above the window.
Reinstall the two outside mounting screws to hold the assembly in position. Confirm that the hinge remains level, then install the remaining fasteners.
Larger shutters can be heavy. Use appropriate ladders, lifting equipment and additional assistance when necessary.
Step 8: Install the Building-Side Support Brackets
Lift the bottom of the shutter outward and determine the final location of the support-arm brackets alongside the window.
Position each building-side bracket so the raised portion points away from the window.
Mark and pre-drill the mounting locations, then securely fasten both brackets to the building.
Step 9: Connect the Support Arms
Assemble the adjustable support arms and connect each one between the shutter-side bracket and the corresponding building-side bracket.
Secure the shutter end with the supplied threaded hardware. The building-side end connects to the bracket with the removable L-shaped pin.
Confirm that all connections are secure before allowing the support arms to carry the full weight of the shutter.
Step 10: Adjust the Shutter
Loosen the support-arm locking collars and raise or lower the shutter to the desired position.
Adjust both sides evenly so the shutter remains level. Tighten the locking collars to hold the selected angle.
Repeat the process for neighboring windows, maintaining a consistent angle where practical.
Tools for Installing Bahama Shutters
The exact tools and fasteners required depend on the building and mounting surface. A typical installation may require:
- Sturdy ladder
- Stable work surface
- Tape measure
- Level
- Pencil or awl
- Drill
- Drill bits
- Driver bits
- Pliers
- Corrosion-resistant mounting screws
- Masonry anchors or other specialty fasteners when required
A second person is strongly recommended when lifting and positioning larger shutters.
Can Bahama Shutters Be Closed?
Wood and PVC Bahama shutters can be lowered toward the window by disconnecting or adjusting the support arms. Verify adequate clearance around the window, sill and trim before lowering the shutter.
Wood and PVC Bahama shutters are not impact-rated hurricane shutters and should not be relied upon as approved hurricane protection. For tested storm protection, use aluminum Bahama hurricane shutters manufactured and installed according to the applicable product approval and installation requirements.
Complete the Bahama Shutter Installation
After installation, operate each shutter through its intended range of movement. Confirm that the top hinge is securely fastened, both support arms are properly connected, and the shutter remains level at the desired angle.
Periodically inspect the hinge, support arms and mounting fasteners as part of normal exterior shutter maintenance.
ShutterLand offers custom wood Bahama shutters and PVC Bahama shutters with optional top hinges and adjustable support arms.