Installation instructions are written by ShutterLand, a U.S. exterior shutter specialist with over two decades of hands-on experience mounting shutters on residential homes and commercial properties.
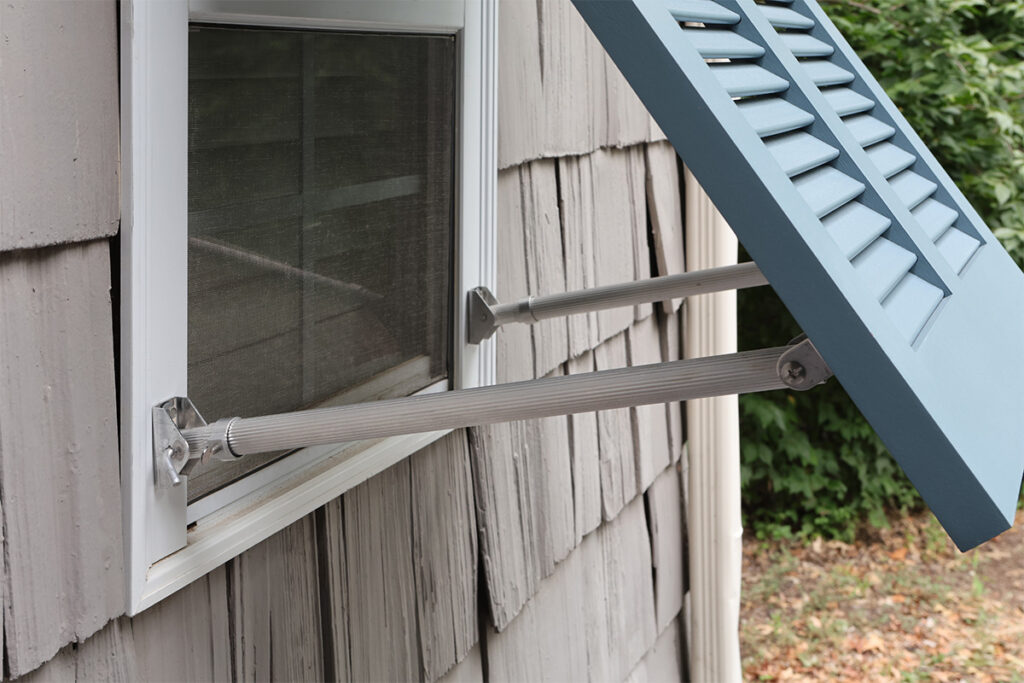
Installing Bahama shutters requires two main components: a top-mounted suspension hinge and extension support arms at the bottom. Working together, these parts provide the proper support and angle for the Bahama-style shutter.
A successful installation starts with properly measuring for Bahama shutters. Accurate measurements ensure the suspension hinge and support arms are positioned correctly, allowing the shutters to operate smoothly and fit securely. Skipping this step can lead to misaligned hardware, reduced performance, and avoidable installation difficulties.
The top-mounted hinge creates a fulcrum for the shutter to pivot and extend away from the window at the bottom. Support arms cantilever between the window and shutter to stabilize the panel in a stationary open position.
Tropical Bahama shutters are relatively easy to install with an organized sequence of steps. Installation of Bahama shutters will vary from one window to the next, making it necessary to modify and adapt the process for each. Mounting Bahama shutters is very different from the installation of standard exterior wood shutters.
Bahama Shutter Hinges
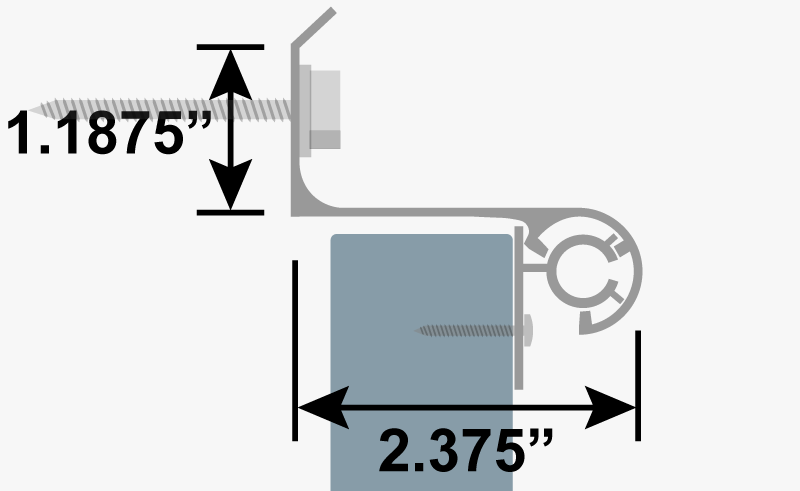
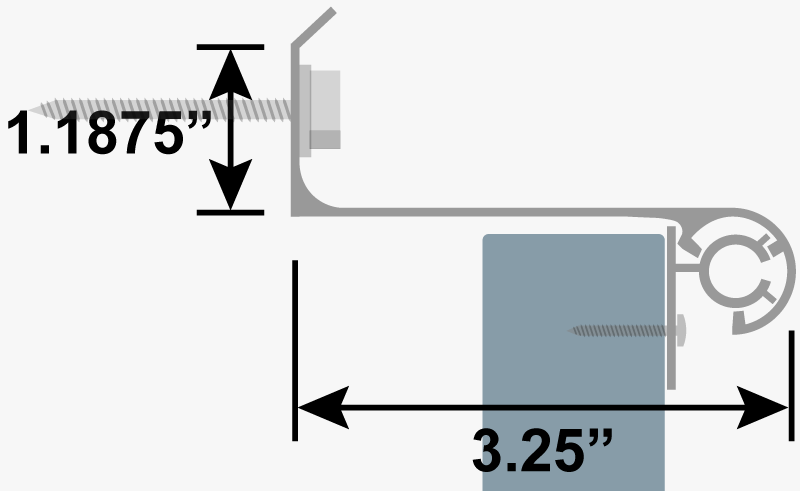
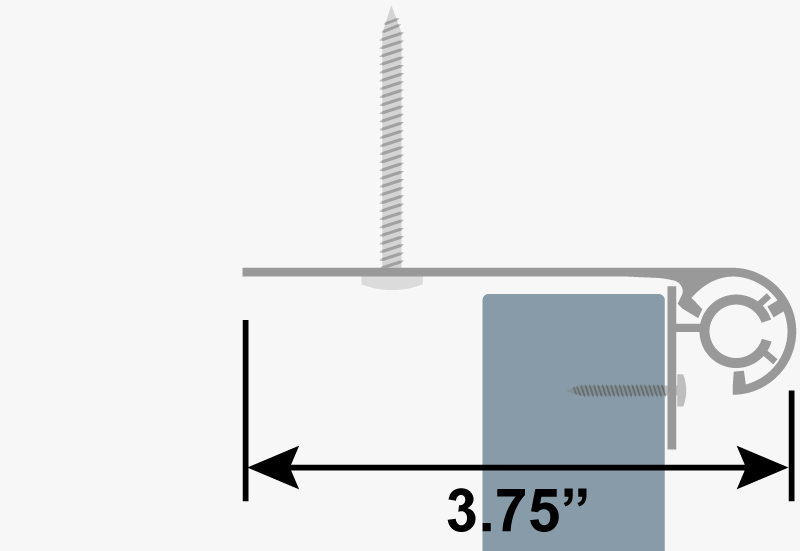
The standard installation method for Bahama shutters uses an aluminum sliding track hinge mounted to the header, suspending the shutter in front of the window. This hinge consists of two interlocking sections: one fastens to the top of the window opening, and the other attaches to the top face of the exterior shutter. Installation screws are not included. Track hinges for ShutterLand Bahama shutters are available when ordering, with depth determined by hinge style—standard, build-out, or flat-top. The hinge length matches the shutter width. Each hinge arrives in a natural silver finish (unpainted) but can be painted as desired.
Standard Hinge A standard depth hinge is 2.375″ deep and secures just above the window.
Deep Hinge A build-out hinge is 3.25″ deep and secures just above the window.
Flat Hinge The flat hinge screws into the window header so the shutter can nest inside of the window opening.
Benefits of Installing with Bahama Hinges
Installing Bahama shutters with a top sliding hinge offers multiple benefits for both function and appearance. This versatile installation method works with deep or shallow window openings while fully supporting the shutter’s weight. The hinge’s horizontal ledge shields the top edge of the exterior shutter from heavy rain and makes leveling simple during installation.
With its smooth mobility, the hinge allows the shutter to lift up to a 70-degree angle away from the window, to customize airflow, light, and exterior access. ShutterLand hinges arrive in a natural silver aluminum finish but can be painted black or color-matched to the window shutter for a seamless look. Designed for a clean look and simple operation, these hinges are compatible with both wood Bahama shutters and PVC Bahama shutters.
Alternative multi-hinge systems (see picture above) operate when mounted in alignment with the two outside stiles of a Bahama shutter. Some hinges are designed to nest Bahama shutters inside of a deep opening, while others provide enough clearance for the window shutter to mount proud of the opening. Each hinge consists of two components that interlock with a central pintle. The heavy cast iron or stainless steel construction will contribute desirable visual accents and reliable service. This type of hinge will need to be purchased from an outside shutter hardware supplier.
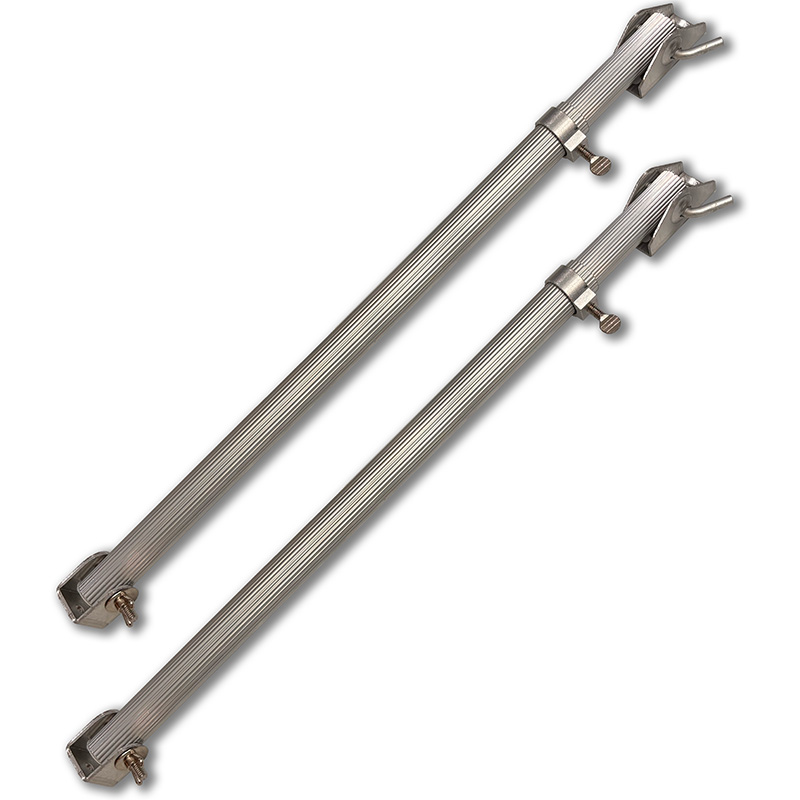
Bahama Shutter Support Arms
Support arms, also known as shutter stays, are used to hold the base of a Bahama shutter away from the window at a set angle. The larger end of the telescoping pole is secured to a U-shaped bracket attached to the shutter. The smaller end fits into a camel bracket mounted on the building and is held in place with an L-shaped pin. A tension O-ring allows the angle of the shutter to be easily adjusted, then tightened to lock it securely in position. Disconnecting and removing the central pole from the brackets permits the shutter to lower for moderate storm protection.
ShutterLand offers adjustable support arms with the purchase of Bahama shutters.
Available Support Arm Lengths:
12″ Arms: The 12″ arms extend to a maximum length of 20″ (including the brackets).
18″ Arms: The 18″ arms extend to a maximum length of 32″ (including the brackets).
24″ Arms: The 24″ arms extend to a maximum length of 44″ (including the brackets).
—
Wall Brackets (Camel Brackets): 1.125″ wide, 2.375″ tall, 1.375″ deep
Shutter-Side Brackets: 1.125″ wide, 1.0625″ tall, 1.5″ deep
To figure the support arm length needed, enter the desired shutter height. The length shown is calculated based on the assumption that the support arm will connect to the base of the window and the bottom of the Bahama shutter.
If the arm is attached higher on both the wall and the shutter, the length will be shorter.
DIY Bahama Shutter Supports
Some homeowners choose to create their own DIY supports for Bahama shutters, often using wedge-shaped wooden blocks or bent metal brackets. While this approach can be the least expensive installation method, it may reduce the shutter’s functionality, limit adjustability, and affect long-term durability
A custom DIY Bahama shutter arm can be crafted from a variety of materials to suit personal style and budget. Some homeowners design wooden stays in decorative shapes, adding a unique architectural accent that enhances the character of the home.
Determining the Best Bahama Shutter Angle
The ideal angle for Bahama shutters is largely a matter of personal preference. ShutterLand wood Bermuda shutters feature fixed louvers set at 30°, while PVC shutters have louvers fixed at 25°. For maximum visibility, the mounting angle should position the shutter louvers as close to parallel with the ground as possible. Slightly lowering the angle can help direct rainwater away from the window, preventing it from collecting on a horizontal louver.
For street-level installations, a high mounting angle can cause the shutters to project too far into usable space. In these cases, lowering the angle further can improve clearance and comfort. Keep in mind that the further the shutters deviate from the ideal viewing angle, the more restricted the interior sight line will be. Raising louvers beyond horizontal is generally not recommended, as it can compromise both appearance and function.
When installing Bahama shutters across multiple windows, maintain a consistent angle for a uniform look. Taller shutters will require longer mounting arms to match the angle of shorter panels.
Bahama Shutters Installation Instructions
This is an abbreviated guide for installing Bahama shutters. Our installation video offers complete instructions.
Step 1: Separate the top track hinge from the bottom
The lower hinge leaf will slide through the channel and away from the header leaf.
Step 2: Drill screw holes in the header hinge
Locate 1.5″ from either end and equally space no more than 8″ apart. The size hole is based on the installation screws selected (not included). Drill holes in both the header and hanging hinge leafs.
Step 3: Center and screw to the top front face of the shutter
Make sure the shutter is right side up and the louvers are pointed in a downward direction. Position the C-channel toward the top.
Step 4: Attach support arm brackets on back of the shutter
The brackets will screw into the side stiles at the determined height.
Step 5: Align the header hinge with the top of the window
Screw in the top right side, then level and secure the far left side. Pre-drill remaining hole positions.
Step 6: Remove the header
Slide the detached header leaf over the lower leaf that is now screwed to the shutter.
Step 7: Lift the Bahama shutter into position
With the shutter over the window, replace the top right and left screws (not included) to hold the hinge. Then secure the remaining screws.
Step 8: Fasten the window-side brackets
Holding the shutter away from the window, screw in the support brackets to the left and right of the window (screws not included).
Step 9: Connect the support arms
Thread pins through the holes in the bracket and end of the support arm at all four points.
Step 10: Adjust the Bahama shutter angle
Release the support arm tension knobs to raise or lower the Bahama shutter to the desired angle. Tighten the knobs to set the position.