Installation instructions are written by ShutterLand, a U.S. exterior shutter specialist with over two decades of hands-on experience mounting shutters on residential homes and commercial properties.
The procedure to install wood exterior shutters is largely determined by the window configuration and the function they will be asked to perform. The execution depends on the objective outlined in the measuring for outside shutters phase. The installed outdoor shutters will either be hinged to swing open and closed or permanently fixed in place with brackets.
Follow the steps outlined below for a successful installation of exterior shutters. Use the videos in conjunction with the written instructions. This guide applies to wood louvered, solid panel, combination, or board and batten shutters.
Install Exterior Shutters to Operate
Step 1: Briefly hold the shutters in the window opening with shims to establish equal spacing top and bottom with adequate margins on both sides and the middle. The bottom rail of the panels is equal to or larger than the top, and the louvers will slant down and away from the window. Approximately 1/8 to 1/4 inch is necessary to install exterior shutters to swing freely. Outside shutters may be trimmed slightly (less than 1/4”) to increase clearance. Prime and paint the cut edge to continue.
Step 2: Observe and remove any obstructions that may prevent the panels from swinging fully open.
Step 3: With the shutters still in the window, identify where the outdoor hinges will attach. Use pieces of painter’s tape to mark each hinge location on the shutter, which can be extremely valuable when installing multiple window shutters at one time.
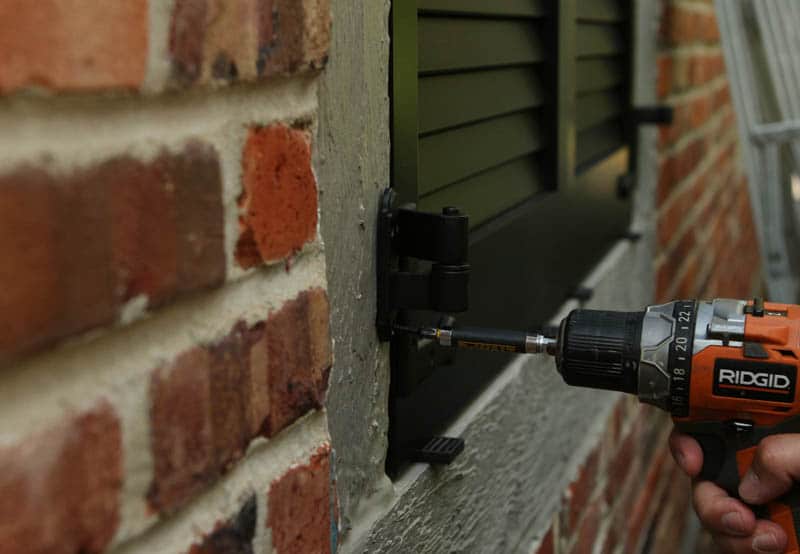
Attach Shutter Hinges
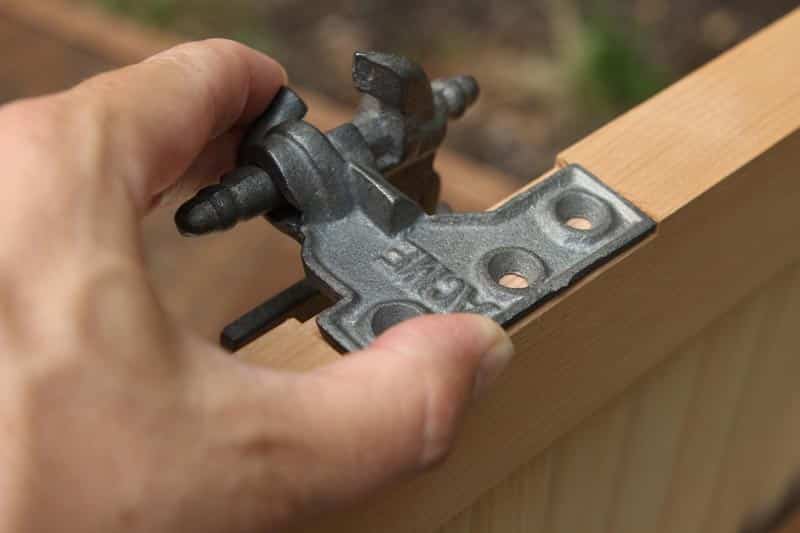
Step 4: Remove the panels and place them horizontally on sawhorses or another flat, elevated surface. The side of the outdoor shutter that was facing out will now be facing up. Replace the painter’s tape in one corner with the selected hinge. Align the strap or New York Style L-hinges vertically to the edge of the panel and horizontally to the center of the rail. Mortise hinges and narrower surface-mount hinges often align more centrally.
Tip: Salvage original fittings when installing replacement shutters to save money. Recondition by using a wire brush to remove loose debris and mild corrosion. Clean and spray paint to restore the original luster.
Step 5: Use an awl to mark each hole, then tighten all screws. Mount all remaining hinges in the same fashion.
Step 6: Return the exterior shutters to the window with the shims in place. Seat each pintle into place and embed a screw into the casing through the lower hole on all four corners. Swing the panels partially open and carefully lift off the pintles, making sure not to alter their alignment. Then, fasten the remaining pintle screws.
Install Shutter Dogs
Step 7: Place the panels to the window for the last time, extended wide to the side of the opening. Identify the best shutter dog mounting point. Shutter dogs keep the panels anchored against the house and rotate to release the panels to swing freely. The lag bolt entry point should be about 1/4 the width of the shutter from the outside edge and roughly 1-1/2 inches from the bottom.
Step 8: Predrill a hole to accommodate the dog bolt. Ratchet the bolt so the back of the shutter dog meets the panel face when fully open.
Step 9: Secure the remaining external hardware to complete the installation.
Install Exterior Shutters to be Stationary
Step 1: Temporarily hold one outside shutter in place beside the window to confirm there are no obstacles that need to be removed prior to installation. Establish also that the screws placed in the four brackets at the top and bottom of the shutters will connect with a solid surface. The bottom rail is larger than the top, and the louvers will angle up and away from the building. The polycarbonate supports are clear and will not distract from an attractive presentation.
Step 2: Holes in Lexan brackets are not pre-drilled. Use a 1/4″ bit to drill two holes on one edge of the first bracket. The holes should be about 2″ from each end of the bracket. Then drill holes on the other edge of the bracket, each about 2.5″ from the bracket end. Repeat this process for all of the long brackets. Some shutters require additional support with centered side bracket(s). Drill one hole on each edge of the smaller brackets.
Step 3: Establish the placement of the lower bracket on one side of the window. Pre-drill the siding and secure the screw closest to the window. Level the bracket and screw in the opposite side.
Step 4: Lift the shutter to rest on top of the bracket. Mark the location of the top bracket.
Step 5: Lower the shutter. Then, level, pre-drill, and mount the top bracket.
Step 6: Lift the shutter back into place. Mark the hole positions on the top and bottom of the shutter.
Step 7: Remove the shutter and pre-drill at each of the points. Replace the shutter and insert a short screw into each of the holes.
Step 8: Repeat the process for the opposite side shutter to successfully complete the installation.
Installation Tools Necessary
Most installations require:
Sturdy ladder
Cordless drill
1/8 inch drill bit
Ratchet wrench set
Stainless steel screws and corresponding driver bit
1/4 inch spacers
Level
Wood filler
Putty knife
Touch-up paint
Additional provisions may be necessary. Every window on every house is unique, which results in a unique approach and application for each situation.