
How to Install PVC Exterior Shutters
Installation instructions are written by ShutterLand, a U.S. exterior shutter specialist with over two decades of hands-on experience mounting shutters on residential homes and commercial properties.
PVC exterior shutters can be installed in a fixed position or mounted with hinges for functional operation. The intended installation method should be determined during the measuring for PVC shutters process because it affects shutter dimensions and hardware requirements.
ShutterLand offers fixed mounting brackets for stationary installation. For functional installations, we recommend a hinge and shutter dog support kit (from Amazon) that includes hanging hinges and a combined shutter dog and lower support. A standalone shutter dog support kit is also available for installations using separately sourced hinges.
Shutters ordered with no hardware require the installer to provide the appropriate mounting or support hardware for the selected installation method.

Before Installing PVC Exterior Shutters
Unpack and inspect the shutters after delivery. Confirm that the shutters, finish, and hardware are in good condition before beginning installation.
Factory-painted PVC shutters arrive ready to handle, but the finish is still in the early stage of curing. Avoid placing them directly against rough, dirty, or textured surfaces.
Store the shutters horizontally on their long side edge. Use polyethylene plastic sheeting or parchment paper as a separator between painted shutters or between the shutters and another surface. Do NOT store PVC shutters standing vertically on end, leaning upright against a wall, or with cardboard or other packing material touching the painted finish.
Tools for Installing PVC Shutters
Typical installation tools include a drill, drill bits, level, tape measure, pencil or marker, screwdriver, wrench or ratchet set, and a sturdy ladder for elevated windows.
Fasteners and drill bits will vary depending on the mounting surface. Wood, siding, brick, stone, and masonry may each require different fasteners, anchors, or preparation.
How to Install Functional PVC Exterior Shutters
Functional PVC shutters are mounted with hinges so they can swing between a closed position over the window and an open position beside the building. Depending on the window depth and the measurements used when ordering, the shutters may close in front of the window opening or nest within the opening.
Support Requirements for Functional PVC Shutters
PVC shutters are constructed from substantial components and are heavier than vinyl, wood, or composite shutters. When a functional shutter is swung open beside the window, that weight extends away from the hinge line and places a continuous load on the mounting hardware. PVC also becomes slightly pliable as temperatures rise.
For this reason, functional PVC shutters need support along the height of the shutter and beneath the lower edge when open. Hanging hinges distribute the load vertically, while the lower support helps carry the weight on the opposite edge. The lower support can be a separate component or combined with a shutter dog into a single apparatus.
| Shutter Height | Minimum Functional Support |
|---|---|
| Under 84 inches | Top hinge + bottom hinge + 1 intermediate hinge + 1 lower support |
| 84 inches or taller | Top hinge + bottom hinge + 2 intermediate hinges + 1 lower support |
For most functional PVC installations, we recommend a hinge and shutter dog support kit (from Amazon). The kit includes:
- 2 – Stainless Steel Right New York Style “L” Hinges
- 2 – Stainless Steel Left New York Style “L” Hinges
- 2 – Stainless Steel Vertical Middle Hinges
- 6 – Pintles and Pintle Shims
- 2 – “S” Shaped Shutter Dogs and Lag Bolts
- 22- 1.25″ Hinge screws
Standalone shutter dog supports can also be purchased separately for installations if using other compatible hanging hinges.
Different hinge styles, pintles, offsets, and mounting configurations are explained in the exterior shutter hinge guide.
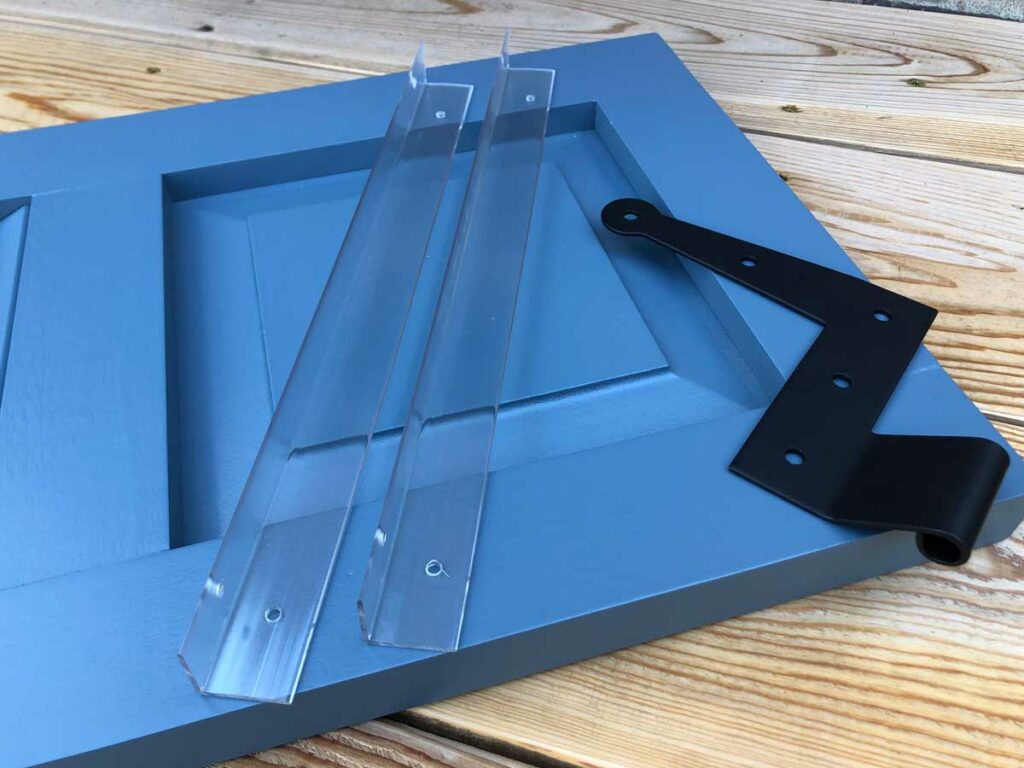
Step 1 – Position the First Shutter in the Closed Position
Begin with one shutter and place it exactly where it will sit when the shutters are closed over the window.
For shutters designed to close in front of the window opening, hold the shutter flat in its intended closed position. Position the inside edge toward the center of the window and the hinge-side edge toward the outside. An assistant can support the shutter while its position is established.
For shutters designed to close inside the window opening, place the shutter within the recess and use temporary shims around the perimeter to maintain the operating clearance established during measuring.
Maintain about a 1/8″ space between the two shutters where they meet in the center.
Louvers will slope downward toward the exterior when the shutter is closed. The bottom rail is equal to or larger than the top rail.
Step 2 – Mark the Top and Bottom Hinge Locations on the Shutter
For surface-mounted strap or New York-style L-hinges, the top and bottom hinges generally align with the horizontal top and bottom rails. Position the horizontal portion of the hinge approximately centered on the rail. Hinges are most commonly visible only when a shutter is closed, and will be the subject of these instructions. Some hinge varieties mount on the opposite side.
Pintles need to be secured to vertical surfaces on the same plane. Uneven siding or trim may require solid, possibly wedge-shaped, shims behind a plate-mounted pintle.
Step 3 – Attach the Hinges to the Shutter
Remove the shutter from the window and place it horizontally on a stable worktable or padded sawhorses with the hinge-side face up.
Position the top and bottom hinges at the locations established in the previous step. The hinge barrels should extend beyond the outside edge of the shutter so they can engage the pintles.
Mark the screw-hole locations with an awl or pencil.
Pre-drill each hinge-screw location with a 1/16-inch drill bit, drilling no deeper than the length of the mounting screw.
Return each hinge to position and fasten it securely to the shutter. Tighten the screws firmly without overtightening.
Center the intermediate hinge, pre-drill, and screw into place. If using two middle hinges, space them at equal intervals.
Step 4 – Establish the Lower Pintle Position
With an assistant supporting the shutter, return it to the exact closed position established earlier.
Insert the lower pintle into the barrel of the bottom hinge and hold the pintle plate flat against the mounting surface.
Mark the lowest mounting hole in the pintle plate.
Move the shutter aside as needed and pre-drill the marked location using the appropriate drill bit for the mounting surface.
Return the pintle to position and install one mounting screw only. Leaving the pintle partially fastened allows minor adjustment while the upper pintle is positioned.
Step 5 – Establish the Upper Pintle Position
Return the shutter to the window and engage the bottom hinge with the lower pintle.
Support the shutter so its full weight is not carried by the single lower-pintle screw.
Return the shutter to its correct closed position and check it with a level.
Insert the upper pintle into the barrel of the top hinge and hold the pintle plate flat against the mounting surface.
Mark the lower mounting hole in the upper pintle plate.
Pre-drill the marked location and install one screw only through the pintle plate.
At this point, the shutter should hang from the top and bottom hinges, but still require a majority of the weight to be supported by the installer.
Step 6 – Align the Shutter and Secure the Pintle Screws
Close the shutter and level.
Slowly swing the shutter partially open and carefully lift it off the top and bottom pintles.
Install the remaining mounting screws in both pintle plates and tighten them securely.
Rehang the shutter and operate it again to confirm that the alignment has not changed.
Secure the middle hinge pintle using the same method, then test that the shutter operates freely and hinges share the load without binding.
Step 7 – Install the Second Shutter
Position the second shutter in its intended closed position on the opposite side of the window.
When installing a pair, use temporary spacers between the center edges to maintain the planned clearance where the shutters meet.
For an inset installation, use temporary perimeter shims as needed to maintain the operating clearance established during measuring.
Install the second shutter using the same sequence as the first.
Step 8: Install the Lower Support or shutter dog support
If using the multi-functional shutter dog support, thread the washers, S-shaped shutter dog head, and support scroll onto the mounting bolt. Position the assembly so the lifted support post makes contact with the bottom edge of the fully open shutter. Mark the mounting-bolt location, predrill into the siding, and tighten the bolt.
Rotate the support post to the vertical position and tighten the tension screws with the provided Allen wrench. Rotate the shutter dog head to horizontal and fully open the shutter over the support post. Release the shutter dog head so it swings freely against the shutter. The support post should make contact with the bottom edge of the shutter and help carry its weight.
If using a separate lower support, such as a block or L-bracket, position it beneath the bottom edge of the fully open shutter so it makes contact with and supports the shutter. Mark, predrill, and securely fasten the support to the building.
A standard shutter dog can then be installed in addition to the support block to hold the shutter in the open position. Position the shutter dog only after the shutter and lower support have been installed so its final mounting location can be accurately determined.
Repeat the process for the opposite side support and shutter dog.
Step 9 – Install Remaining Hardware and Complete the Installation
Install any remaining pulls, bolts, locks, tiebacks, or other exterior shutter hardware included with the project.
How to Install PVC Shutters in a Fixed Position
PVC shutters can be installed in a fixed position using an aluminum French cleat and L-shaped brackets.
The French cleat supports the weight of the shutter from the top. The L-brackets secure the lower and side edges, keep the shutter positioned against the building, and prevent it from lifting off the cleat.
Each French cleat component is 1½ inches tall and ½ inch thick. When the two mating pieces are nested together, the combined assembly is 2½ inches tall with ½ inch of overlap.
The French cleat is manufactured 2 inches narrower than the shutter, providing approximately 1 inch of clearance at each end when centered. Each cleat has three predrilled ⅛-inch mounting holes.
The installation hardware includes:
- 2-inch screws for attaching the French cleat and L-brackets to the building.
- 1-inch screws for attaching the French cleat and L-brackets to the shutter.
Before Installing Fixed PVC Shutters
Fasteners used to attach the French cleat and L-brackets to the building should penetrate a suitable structural mounting surface. Do not rely on siding alone to support the shutter.
Use the supplied 2-inch screws for hardware attached to the building and the supplied 1-inch screws for hardware attached to the shutter.
On lap siding or other uneven exterior surfaces, the French cleat and L-brackets may fall on different high and low points of the siding. The hardware must be installed on the same vertical plane so the shutter hangs straight and sits flat against the building. Use durable exterior-grade shims behind recessed hardware as necessary.
A 5/32-inch drill bit will be required to predrill holes into the PVC shutter.
Step 1 – Position the Shutter
Hold the shutter against the building in its intended installed position.
Level and mark the wall at the top edge of the shutter and remove.
Step 2 – Locate and Attach the Upper Wall Cleat
Measure 3½ inches down the wall from the line marking the top of the shutter. This establishes the location of the bottom edge of the wall-mounted French cleat.
Center the cleat horizontally within the intended shutter location. Because the cleat is 2 inches narrower than the shutter, each end should be approximately 1 inch inside the finished edge of the shutter.
Align the bottom edge of the cleat with the 3½-inch mark.
Mark the far-left mounting hole and predrill the building surface.
Secure the left side of the cleat with a supplied 2-inch screw, leaving it just loose enough for the cleat to pivot.
Place a level on the cleat and adjust it until level.
Predrill through the far-right mounting hole and secure it with a 2-inch screw.
Predrill and install the center screw.
Do not overtighten the screws or distort the aluminum cleat. Making the final turns with a handheld screwdriver is recommended.
If necessary, install exterior-grade shims behind the cleat so it sits on the correct mounting plane.
Step 3 – Attach the Upper Cleat to the Shutter
Lay the shutter face down on a clean, protected surface.
Position the shutter-side French cleat across the back of the top rail with an equal amount of space between each end of the cleat and the corresponding edge of the shutter.
Measure 1 inch down from the top edge of the shutter to the top edge of the cleat on both sides. The nesting portion of the cleat points downward.
Using the factory-drilled holes in the cleat as guides, predrill the PVC shutter with a 5/32-inch drill bit. Drill no deeper than 3/4″, making certain not to drill through the shutter.
Secure the cleat to the shutter with the supplied 1-inch screws.
Step 4 – Hang the Shutter
Lift the shutter slightly above its intended installed position.
Position the shutter-side French cleat over the wall-mounted cleat and lower the shutter until the two pieces fully interlock.
Step 5 – Locate and Attach the L-Bracket
Predrill both sides of the L-shaped bracket using a 1/4-inch drill bit.
On the 1-3/4″ leg of the bracket, which will attach to the shutter, drill three holes approximately 1/2 inch back from the front lip of the bracket. Position two holes approximately 1½ inches from either end and one hole in the center.
Predrill three holes in the shorter wall-side leg, centered from front to back and about 2″ from either end and in the middle.
Push the L-bracket against the bottom of the shutter and center it, with the longer leg horizontal beneath the shutter and the shorter leg extending up behind the bottom edge. Trace the lower edge of the bracket on the siding with a pencil.
Determine the best vertical locations for the small side L-brackets.
Place one bracket on each side and mark the location on the siding.
Lift the shutter from the French cleat.
Step 6 – Install the L-Brackets
Return the bottom bracket to the marked position.
Mark and predrill the left wall-mounting hole.
Secure the left side of the bracket to the building with a supplied 2-inch screw.
Level the bracket, predrill, and secure the right side.
Install the center mounting screw.
Position the side brackets just wide of the marks and secure them to the building with the supplied 2-inch screws. It is good to have a little clearance between the side brackets and the shutter. It is better for the opening between the brackets to be slightly too wide than too narrow.
Shim behind the brackets as necessary so they align with the mounting plane of the upper cleat.
Step 7 – Secure the Shutter to the L-Brackets
Return the shutter to the wall and hang it from the upper French cleat.
Using the predrilled 1/4-inch holes in the L-brackets as guides, predrill five locations into the PVC shutter with a 5/32-inch drill bit.
Secure the bottom L-bracket to the bottom edge of the shutter with the supplied 1-inch screws.
Secure the side brackets to the shutter with the 1-inch screws.
Do not overtighten the screws.
Alternate Fixed Installation
PVC shutters can also be installed in a fixed position using another appropriate mounting method when the French cleat and L-bracket system is not used.
When fastening directly through the PVC shutter, use a 5/32-inch drill bit to predrill every shutter fastener location before inserting the mounting screws.
Use enough attachment points to support the shutter evenly. Maintain appropriate separation between the shutter and the building to accommodate the mounting surface and allow drainage.
Fasteners should penetrate a suitable structural mounting surface rather than relying on siding alone. Use appropriate exterior-grade fasteners and anchors for the wall construction.
Do not overtighten fasteners or distort the PVC shutter.
Installing PVC Bahama Shutters
PVC Bahama shutters use a different mounting system from side-hinged shutters. A Bahama shutter mounts horizontally above the window with a top hinge and is held outward from the building with support arms.
Use the dedicated Bahama shutter installation instructions for this shutter style.
Care and Maintenance
PVC exterior shutters require minimal routine maintenance. Clean the shutters as needed with mild soap, water, and a soft cloth or soft-bristle brush, and avoid pressure washers, abrasive cleaners, and harsh chemicals that may damage the painted finish.
Periodically inspect painted surfaces and mounting hardware for wear or damage. Factory-painted shutters continue to cure after delivery and typically reach full cure in approximately 21 days. Follow recommended exterior shutter care and maintenance practices to help preserve the finish and appearance over time.
Frequently Asked Questions About Installing PVC Shutters
How many hinges do PVC exterior shutters need?
PVC shutters less than 84 inches tall require at least an upper hinge, lower hinge and one intermediate hinge. Shutters 84 inches tall or greater require an upper hinge, lower hinge and two intermediate hinges. Functional PVC shutters also require a lower support.
The recommended shutter dog support kit includes hanging hinges along with the combined shutter dog and lower-support hardware.
Do PVC shutters need a shutter dog?
No. A shutter dog is not required, but functional shutters do need a mechanism to hold them in an open position. Shutter dogs are a traditional, attractive, and effective restraint. PVC shutters do require lower support when open.
A shutter dog support combines the tieback and required lower-support functions into one assembly. It is available either as part of the recommended shutter dog support kit with hanging hinges or as a standalone component for use with separately sourced hinges.
Can PVC shutters be installed with butt hinges?
Yes. Butt hinges can be appropriate for some recessed or inset installations when sufficient mounting depth and a suitable structural attachment surface are available. The required intermediate support points still need to be incorporated into the hinge arrangement.
Can PVC shutters be permanently mounted beside a window?
Yes. PVC shutters can be installed in a fixed position using an aluminum French cleat and L-shaped brackets. The cleat supports the shutter from the top, while the brackets secure the bottom and sides. Other appropriate fixed mounting methods may also be used.
Does ShutterLand sell functional PVC shutter hardware?
ShutterLand does not sell the hanging hinges or shutter dog support used for functional PVC installations. We recommend a hinge and shutter dog support kit available from an outside supplier that includes hanging hinges and the combined shutter dog/lower-support assembly.
For installations where compatible hinges are being purchased separately, a standalone shutter dog support can also be ordered from an outside supplier.
ShutterLand does offer mounting brackets for PVC shutters installed in a fixed, non-operable position.
Can the same installation instructions be used for other shutter materials?
Installation methods vary by material, so other custom exterior shutters should be installed according to the instructions provided for their specific construction and hardware.
Do PVC shutters expand and contract?
Yes. PVC naturally expands and contracts as temperatures change and can become more flexible in warm conditions. Proper operating clearance and adequate support help accommodate normal material movement.
